


Do you want to control your TV and other devices with your smartphone or tablet? Or even use voice assistants like Alexa or Google Assistant? You can do all of this with the Logitech Harmony Hub. Here’s how to set up a Logitech Harmony Hub:
Setting up the Logitech Harmony Hub may seem confusing if you’re not tech-savvy. But don’t worry, we’re here to help.
- Connect the power to the Harmony Hub using the micro USB cable and connect the IR mini blaster if needed.
- Download and open the Harmony app on IOS or Android, or the MyHarmony desktop application.
- Select “Set Up New Hub”.
- Choose the WiFi network for the Hub to connect to and enter the password.
- Sign in to your Harmony account or create a new one.
- If you don’t have previous remote settings, select “Add as new remote”.
- Add your devices by selecting “Add Device” and entering the manufacturer name and model number.
- The Harmony app will suggest activities based on the devices you have added.
There’s more you can do with the Harmony Hub. We’ll go into more detail about each step and its capabilities in the future.
Table of Contents
- Take Control of Your Home Entertainment with Harmony Hub
- What devices can the Harmony Hub control?
- How Can You Control Your Home Devices Seamlessly with Harmony Hub?
- How Much Does Harmony Hub Cost?
- How To set up a Logitech Harmony Hub?
- 1- Connect Power to the Harmony Hub
- 2- Connect the IR Mini Blaster if Necessary
- 3- Download and Open the Harmony Control App on IOS or Android
- 4- Initial Configuration of the Harmony Hub
- 5- Set Up the Wi-Fi connection
- 6- Sign Up or Login with a Harmony Account
- 7- Add Your Device as a New Remote
- 8- Copy Setup from Other Harmony Remote
- 9- Adding Devices to the Harmony Hub
- 10- Testing Devices. Do the On and Off commands work?
- 11- Adding an Activity
- 12- Testing the Activity
- 13- Harmony Hub Activity Summary
- 14-Setup Completed
- Controlling the Activity with the Harmony App
- Other Harmony Products
- Related Q&A
- To Sum Up
Take Control of Your Home Entertainment with Harmony Hub
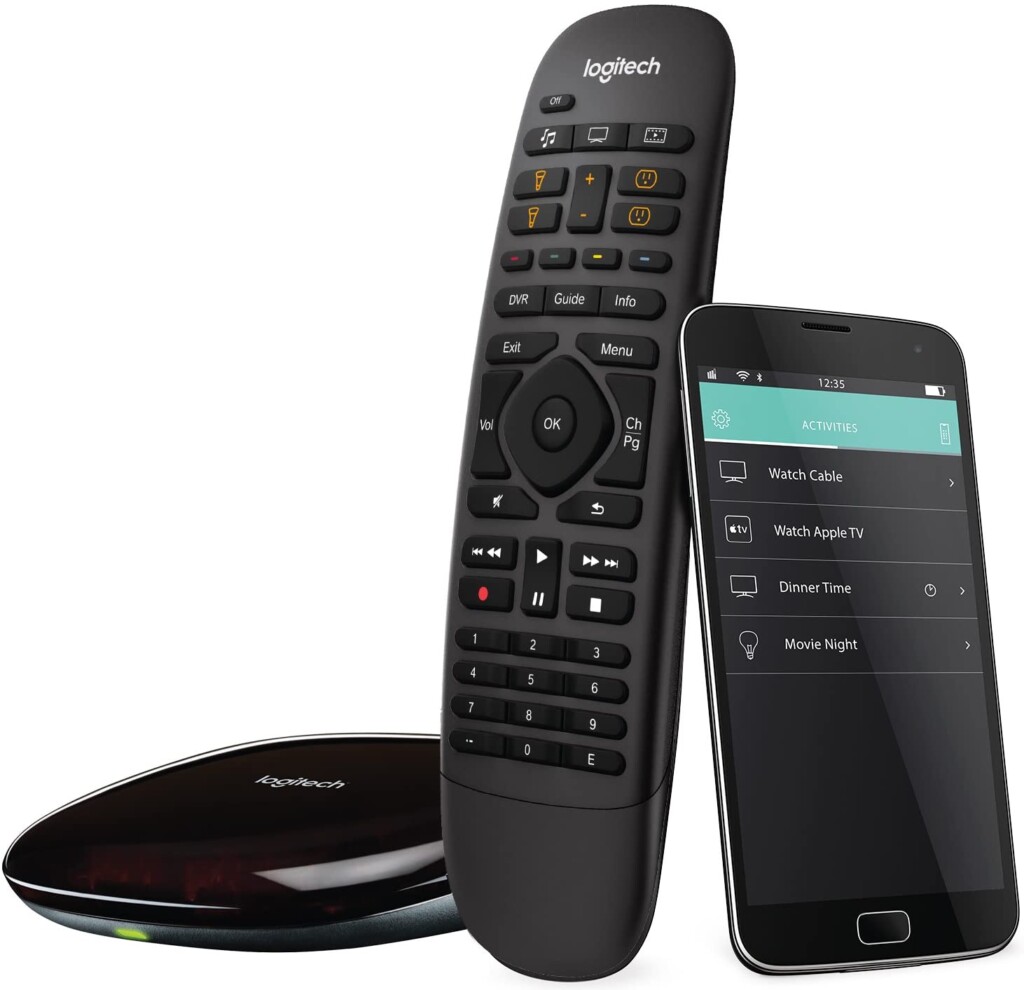
The Logitech Harmony Hub (on Amazon) is a convenient solution for controlling your entertainment and smart home devices (Our top picks). With this hub, you can use your smartphone or tablet to manage all your devices in one place.
By creating activities, you can easily control multiple devices at once. For example, you can start a “watch TV” activity and the hub will turn on your TV and cable box, set the inputs, and allow you to change channels, adjust volume, and more. With just a few taps on your device, you can have a seamless and streamlined experience for all your entertainment needs.
Additionally, you can even use voice commands through Alexa or Google Assistant to control your devices. No more juggling multiple remotes or searching for the right device to control. The Harmony Hub makes it easy for you to manage all your devices in one place.
What devices can the Harmony Hub control?
The Logitech Harmony Hub is a versatile device that can control a variety of entertainment and smart home devices. It can use IR, WiFi, and Bluetooth to control your devices, making it a versatile solution for all your needs.
To check if your devices are compatible with the Harmony Hub, you can use the device compatibility search tool. This tool will let you know if your devices can be controlled by the hub or not.
The hub is compatible with a range of devices produced by major manufacturers, including:
- Televisions
- Projectors
- AV Receivers
- Set Top, Cable, or Satellite Boxes
- DVD and Blu-ray Players
- Game Consoles
- Other Media Devices
- Smart Thermostats (Nest, Honeywell, Ecobee)
- Smart Window Shades (Lutron Caseta, Hunter Douglas)
- Smart Lights Bulbs and Lighting Systems (Phillips Hue, Lutron, LIFX)
- Devices connected to other smart hubs
This list is constantly growing, so there’s a good chance that even more devices will become compatible with the Harmony Hub in the future. With this hub, you can control all your devices in one place, making it easier for you to manage your home entertainment system.
How Can You Control Your Home Devices Seamlessly with Harmony Hub?
The Logitech Harmony Hub lets you control your entertainment devices with a Harmony remote control, smartphone, or tablet. It works by sending out IR commands to different devices, ensuring that they receive the signals and follow your commands.
To enhance the performance of the hub, connect the IR mini blaster to it. This will help ensure that IR commands are received more effectively by your entertainment devices.
The hub allows you to create activities, which are a set of commands for controlling multiple devices at once. For example, you can create a “Watch TV” activity. When you turn on this activity, the hub will power on your television, cable box, and receiver (if you have one), and set them to the correct input. This makes it simple and convenient for you to control your entertainment system with just a few taps or clicks.
With the Harmony Hub, you can control different devices via Bluetooth or WiFi/IP. This makes it a versatile and convenient solution for managing your home entertainment system. All your devices are in one place, making it easy to control them, set inputs, power on and off, and more.
How Much Does Harmony Hub Cost?
The Logitech Harmony Hub (Check price on Amazon) is an affordable solution for managing your entertainment and smart home devices. Compared to other universal remote control systems, it offers excellent value for the price. With just a few taps or clicks, you can control all your devices from one convenient app on your smartphone or tablet.
Setting up the Harmony Hub is straightforward and easy. You can use the Harmony app on your iOS or Android device, or the MyHarmony desktop application. Simply follow the steps to connect the hub to your WiFi network, sign in to your Harmony account, and add your devices.
How To set up a Logitech Harmony Hub?
1- Connect Power to the Harmony Hub
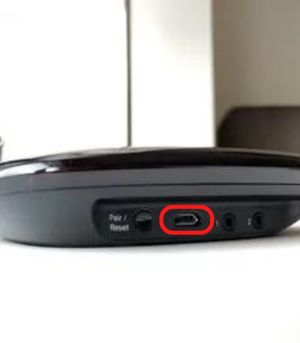
Once you have connected the micro USB power cable to the back of the hub, give it 30 seconds to 1 minute to fully boot up. This time is necessary to ensure that the hub is ready to use and fully functional.
2- Connect the IR Mini Blaster if Necessary
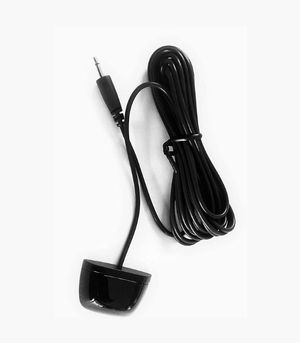
When it comes to your home entertainment system, the IR mini blaster (on Amazon) might not always be necessary. If the hub has a clear view of all your devices, it should work fine. If your equipment is out in the open, for example in an open cabinet, the IR mini blaster won’t be needed. But if your equipment is inside a closed cabinet or in a cramped space, don’t worry. You can still get everything to work by putting the hub inside the cabinet and placing the IR mini blaster outside. This way, it can reach your TV or projector easily.
3- Download and Open the Harmony Control App on IOS or Android

Getting started with your Harmony Hub is easy with the Harmony Control App. The app is available for both iOS and Android, so you can choose the platform that works best for you. Simply download the app from the App Store (for iOS) or Google Play (for Android) and install it on your device.
While there is also a desktop application for setting up the Harmony Hub, it is outdated. If you prefer to use a desktop computer, you can download MyHarmony for Windows or MyHarmony for Mac. However, for the best experience, I recommend using the app on your iOS or Android device to complete the setup process.
4- Initial Configuration of the Harmony Hub

When you first open the Harmony Control App, you will see two options: “Set Up New Hub” and “Connect to Hub”. To set up your brand new hub, simply tap on “Set Up New Hub”. This will start the process of getting your new hub up and running. From there, the app will guide you through each step of the setup process.
5- Set Up the Wi-Fi connection

The hub will automatically search for the nearest WiFi network with the strongest signal. If you want to connect to a different network, simply tap on “Re-Scan”. When you have selected the correct network, you will be asked to enter the password. Type it in and tap “Join”. That’s it! Your hub is now connected to your WiFi network and ready to be set up.
6- Sign Up or Login with a Harmony Account

To get the most out of your Harmony Hub, you will need to create a Harmony account. This account allows you to save your configuration settings in the cloud, so you don’t have to redo all your hard work if you change phones or need to add a new device.
7- Add Your Device as a New Remote
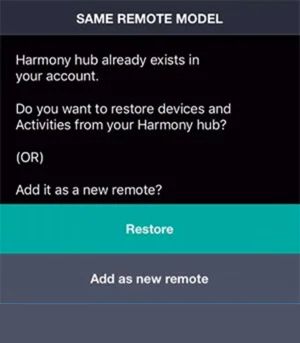
You might see a message asking if you have set up a hub before. If you have, you can restore all your previous activities and added devices by tapping “Restore”. This will save you time and make it easy to get your new hub up and running quickly.
If this is your first time setting up a hub, simply tap “Add as new remote”. This will start the process of adding your new hub as a new remote control.
8- Copy Setup from Other Harmony Remote

If you already have a different Harmony remote, you can import the activities and devices into the app. Simply tap “Import from Remote” to get started. This will save you time and make it easy to transfer your existing activities and devices to your new hub.
9- Adding Devices to the Harmony Hub
Automatically Detected Devices
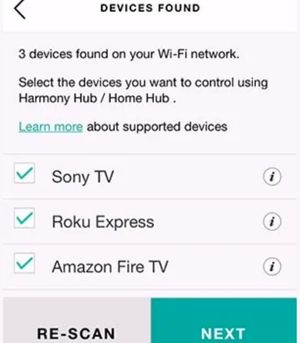
The Harmony Hub will automatically scan your network to find devices that can be controlled through WiFi/IP or Bluetooth. During my setup, the hub found a Sony TV, Roku Express, and Amazon Fire TV. If these devices are in the room you are using, you can leave them checked. If not, simply uncheck them and manually add your devices later.
Manually Adding Devices
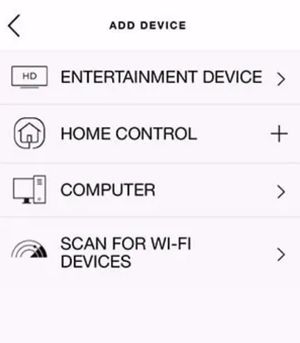
There are four options for adding devices that can be controlled by the Harmony Hub:
Entertainment Devices: Do you like to have control over your TV, projectors, receivers, and other gadgets? Well, this section is just for you! Here, you can add all your entertainment devices, such as your TV, projectors, DVD/Blu-ray players, media streamers, and more.
Home Control: With this feature, you can smarten up your home. The hub lets you control all your smart home devices like your smart light bulbs, smart outlets, thermostats, and more. Plus, you can even add your lights to your activities, so they dim when you turn your system on.
Computer: Admittedly, I’ve never used the computer control feature before. But, I think it might come in handy if you have a media server set up on your computer.
Scan for Wi-Fi Devices: The hub can scan and find all the Wi-Fi devices in your home automatically. This feature makes it easy to add all your devices to the hub in one go.
Adding An Entertainment Device
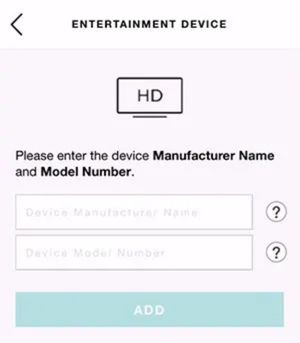
For your living room, you have a Mitsubishi HC4000 projector, Denon AVR-889 receiver, and a Fire TV. All you have to do is enter the information into the app and it’ll do the rest! The app will find the closest match for your devices, making the setup process quick and easy.
Once you’ve added all your devices, you’re ready to move on to the next page. With all your devices in the app, you’ll be able to control and manage them with ease. Whether you want to turn on your projector, adjust the volume on your receiver, or watch a movie on your Fire TV, you can do it all from one central location.
10- Testing Devices. Do the On and Off commands work?
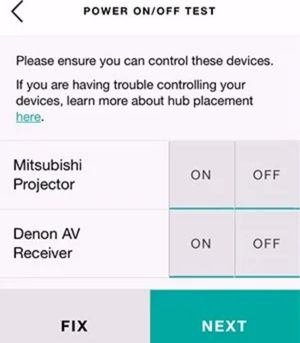
Testing Your Devices: To make sure everything is working properly, you may need to adjust the position of your hub and IR mini blaster. Try using the “On” and “Off” commands multiple times to ensure the IR signals are being received accurately.
Weak Signals: If you notice that the signals seem weak and aren’t working properly, don’t worry! Just adjust the position of your hub or IR mini blaster until all the commands are received accurately.
Troubleshooting: If the “On” and “Off” commands aren’t working at all, tap the “FIX” button. The app will guide you through a troubleshooting process to help you get back on track.
11- Adding an Activity

Creating an Activity: An activity is a group of commands that allows you to power on, set inputs, and control all your devices in one central location. To create a new activity, simply tap “Add Activity”. The app will then suggest activities based on the devices you added.
Suggested Activities: For your setup, the app suggested a “Watch Fire TV” activity, which controls your projector, receiver, and Fire TV. But, if you’d like to create your own activity, you have the option to do so.
Customizing Your Experience: Whether you choose a suggested activity or create your own, the app makes it easy to control all your devices with just a few taps. This way, you can customize your experience and enjoy all your entertainment devices with ease.
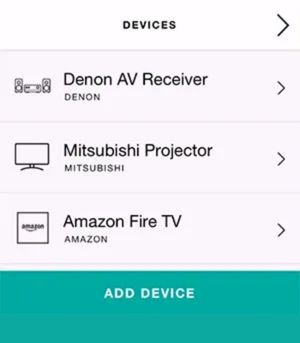
Select Devices to Include in the Activity
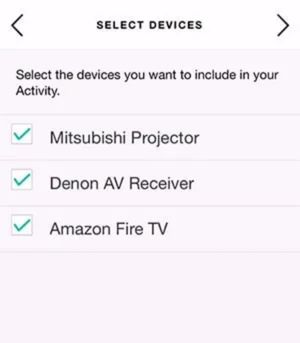
Now it’s time to select the devices you want to include in your activity. For this setup, you’ll select the Mitsubishi Projector, Denon AV Receiver, and Amazon Fire TV.
Ensuring Devices are On: Once you’ve selected your devices, navigate to the next page where the app will ask you to make sure all your devices are powered on. When everything is ready, simply tap “My Devices Are On”.
Ready to Go: With all your devices powered on, you’re now ready to control them from one central location. The app makes it easy to enjoy all your entertainment devices with just a few taps. Whether you want to watch a movie, play some music, or simply turn off the lights, you can do it all from one place.
Setting Inputs for the Activity
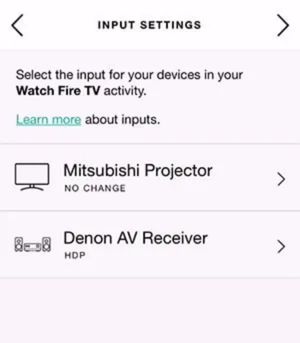
Setting Inputs: Now it’s time to set the input for your devices in this activity. You’ll leave your projector on the same input and switch inputs through the receiver. The Fire TV is connected to the HDMI port labeled “HDP”, so you’ll set the Mitsubishi Projector to “No Change” and the Denon AV Receiver to “HDP”.
Checking the Output: On the next page, the app will ask if you can both hear and see what the Fire TV is displaying. If everything is working properly, simply tap “Yes”. But, if for any reason you’re unable to see and hear the device, tap “No” and adjust the input settings.
Troubleshooting: If you encounter any issues, the app provides an easy way to troubleshoot and fix the problem. With just a few taps, you can ensure that you can see and hear all your devices properly.
Connecting Bluetooth Devices (if necessary)

Connecting Devices: Depending on the media device you have, you may need to connect the Harmony Hub through Bluetooth or Wi-Fi/IP. Devices like Fire TVs, gaming systems, and media streamers usually use Bluetooth, while devices like Roku streamers use Wi-Fi/IP. Both methods work well, but Bluetooth has a more limited range compared to Wi-Fi/IP.
Control Method: The control method you choose will have an impact on the speed and range of your setup. With Wi-Fi/IP, you’ll enjoy incredibly fast control, while Bluetooth offers similar speed but with a limited range.
Choosing the Right Method: Regardless of the method you choose, you’ll still be able to control all your devices with ease. The Harmony Hub makes it easy to connect and control your devices, so you can enjoy your entertainment to the fullest. Whether you’re watching a movie, playing a video game, or listening to music, you’ll have a seamless and enjoyable experience.
12- Testing the Activity

It’s finally time to test your newly created activity. Make sure to choose “Test Now” to check if everything is turning off and on correctly. During the test, all devices involved in the activity will power off, then back on and their inputs will be set.
Pay close attention to the process to ensure all devices have powered on properly. Once the process is finished, the app will prompt you to confirm if everything turned on as expected. If everything went well, select “Yes”. If there was an issue, select “No”.
Testing the activity is an important step as it confirms that all your devices are functioning properly and communicating with each other.
13- Harmony Hub Activity Summary
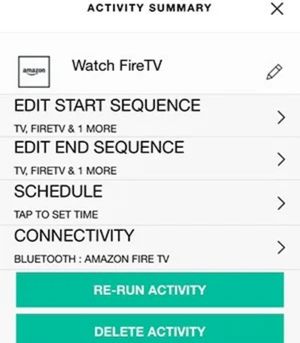
Activity Summary is a useful tool to customize your entertainment setup. Here, you can give your activity a new name, edit the order in which devices turn on or off, set a schedule for when the activity should start and end, and even reconnect Bluetooth and Wi-Fi/IP devices. This feature makes it easy to fine-tune your setup and ensure everything runs smoothly.
Edit Start Sequence
End sequence, on the other hand, is the list of commands executed when turning the activity off. The default end sequence is the power off commands for all devices involved in the activity. Just like the start sequence, you can also customize this by adding custom commands to the devices.
Edit End Sequence
The end sequence is important because it ensures that all of your devices are properly powered off when you’re done using them, which helps to conserve energy and prolong the life of your devices. It’s also important for safety, as you don’t want to leave electronics powered on when you’re not using them. The end sequence is customizable, just like the start sequence, so you can add custom commands if desired.
Schedule
Scheduling is a great feature that can be very helpful in controlling the usage of your devices, saving energy, and making sure that they are not left on when not needed. It also allows you to automate the activity and turn it on and off at specific times, making it more convenient for you and your family.
Connectivity
Awesome to hear that you were successful in solving your problem with Harmony! If anything else arises in the future, don’t be afraid to go through the troubleshooting steps. That’s what they’re there for.
The app is made to be simple and easy to use. That way, you can enjoy your living room setup to the fullest. If you ever need help, the app is always there to support you.
14-Setup Completed
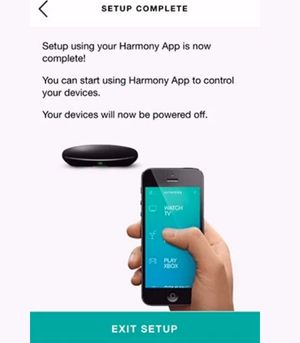
Great job! You’ve finished the setup for the Harmony Hub. Now, when you tap “Exit Setup,” all of your configuration settings will be saved. You should be able to see the activity working just fine.
If you want to add more devices or activities in the future, you can easily do so from the home page of the Harmony control app. The app makes it easy to expand and customize your living room setup. So, feel free to get creative!
Controlling the Activity with the Harmony App
Customizing the button layout of an activity in the Harmony app is easy! The app does a great job of automatically arranging the controls for each activity. However, if you want to make some changes, here’s what you need to know.
How to Modify Button Layouts on the Harmony Hub App
Customizing the buttons on your activity in the Harmony app is a breeze. Most activities come with a bottom bar that you can fully customize with different commands and their placement. The controls on an activity are highly customizable, so you can make them work best for you.
Here’s how to modify the buttons:
- Go to the home page of the Harmony Control App.
- Tap the menu button in the top left corner.
- Select “Edit/Reset.”
- Tap “Edit Buttons.”
- To remove a command, tap the circled “-” (minus symbol).
- To add a command, tap the “+” (plus symbol).
- When adding a command, choose the device you want to send it to and then select the command itself.
It’s that easy! The goal is to make controlling all of your devices as simple and straightforward as possible. So, customize your controls to fit your needs and simplify your life.
Other Harmony Products
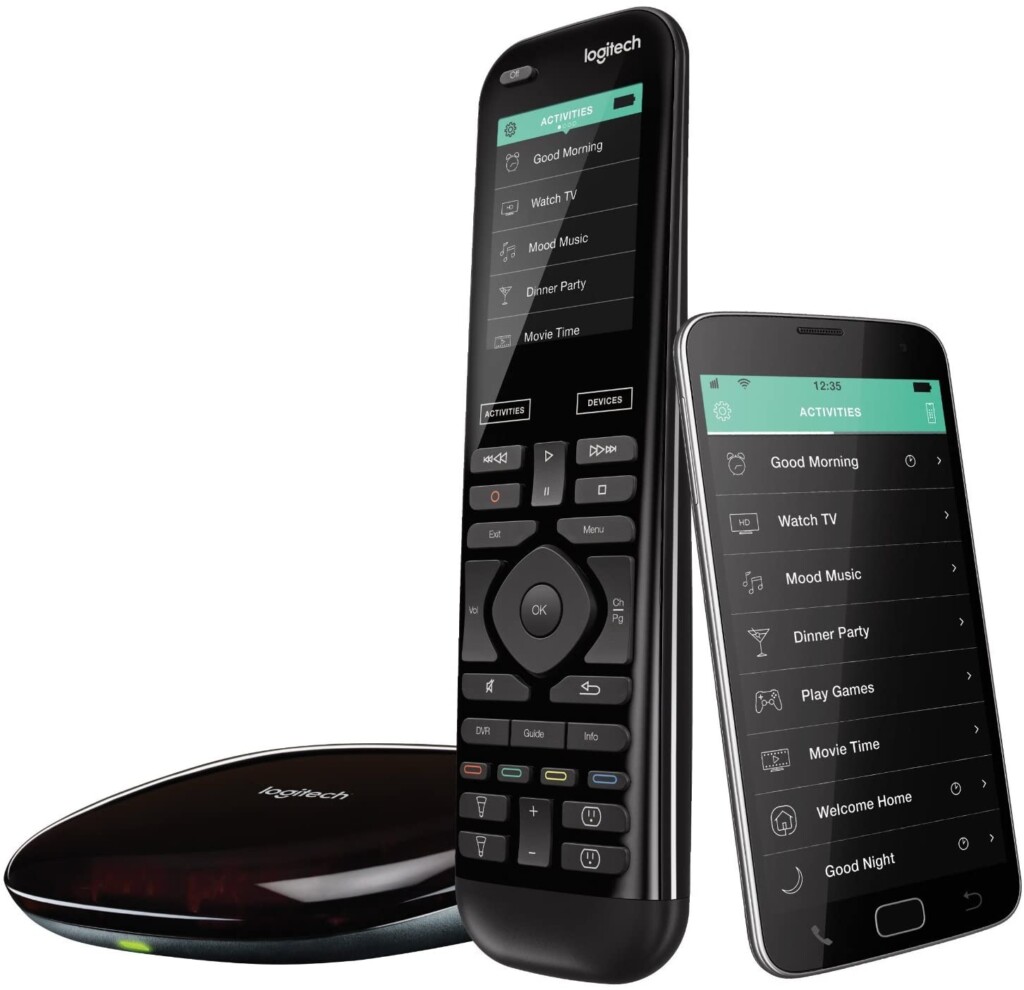
The Harmony product line has even more to offer! Introducing the Harmony Elite (on Amazon) and Harmony Companion (on Amazon) remote controls. Both of these remotes can be programmed to work seamlessly with the Harmony hub. Get it? “Harmony” – it’s a clever play on words!
If you prefer the convenience of a dedicated remote control for your setup, then these are the perfect options for you. With their compatibility with the Harmony hub, you can enjoy an even more streamlined and intuitive control experience. So, check them out and see which one works best for you!
Related Q&A

Having trouble with your Harmony Hub activity?
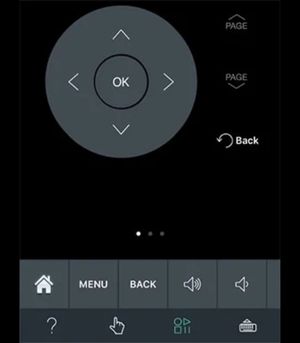
No need to worry! The app has a built-in troubleshooting tool to help you resolve any issues. Here’s how to use it:
- While using the activity, tap the “?” in the bottom left corner.
- You will see three options:
- “Some devices didn’t power on”
- “Some devices didn’t switch inputs”
- “Advanced options”
- If a device included in the activity didn’t power on, select the first option and the app will guide you through some simple troubleshooting steps.
- If all the devices powered on but you can’t see or hear anything, select the second option. The app will help you set the correct input for the activity.
- The third option takes you back to the activity settings, where you can make changes to the activity, such as changing the icon, re-naming, adding or removing devices, etc.
Regarding connectivity, the Harmony Hub only connects to 2.4GHz Wi-Fi networks and cannot connect to 5GHz networks. As for the line of sight, the Harmony Hub accepts commands using RF (radio frequency), so you don’t need a direct line of sight to control it with a smartphone, tablet, or RF-enabled remote control. IR signals, however, require a line of sight, but the included IR mini blaster helps to increase the power of IR signals and make them more likely to be received by devices. Meanwhile, RF (Wi-Fi) and Bluetooth controlled devices do not require a line of sight.
What is the Logitech Harmony Hub?
- The Logitech Harmony Hub is a device that allows you to control your entertainment and smart home devices with your smartphone or tablet.
What devices can the Harmony Hub control?
- The Harmony Hub can control televisions, projectors, AV receivers, set top boxes, DVD players, game consoles, other media devices, smart thermostats, smart window shades, and smart lights.
How does the Harmony Hub work?
- The Harmony Hub sends out IR commands, Bluetooth, or Wifi/IP commands to control different entertainment devices. You can configure activities for powering on, setting inputs, and controlling devices with the hub.
Can I control the Harmony Hub with Alexa or Google Assistant?
- Yes, you can control the Harmony Hub with Alexa or Google Assistant.
How much does the Harmony Hub cost?
- The Harmony Hub is relatively inexpensive compared to other universal remote control systems. Check the current price to get an idea.
Is the Harmony Hub easy to set up?
- The setup can be a bit confusing if you’re not tech-savvy, but the Harmony app and desktop application make it easier.
Do I need to download an app to use the Harmony Hub?
- Yes, you need to download the Harmony app on IOS or Android or the MyHarmony desktop application.
Can I add new devices to the Harmony Hub?
- Yes, you can add new devices by selecting “Add Device” in the Harmony app and entering the manufacturer name and model number.
Can I control multiple devices at once with the Harmony Hub?
- Yes, you can create activities to control multiple devices at once through a single interface.
What is an activity in the Harmony Hub?
- An activity is a set of commands for powering on, setting inputs, and controlling devices. For example, you can create a “Watch TV” activity that powers on your TV, cable box, and receiver, sets the correct input, and gives you a single page to control everything.
How do I control the volume with the Harmony Hub?
- You can control the volume in the Harmony app by using the virtual remote control or through the activity you created.
How do I change channels with the Harmony Hub?
- You can change channels in the Harmony app by using the virtual remote control or through the activity you created.
What are the general steps for setting up the Harmony Hub?
- Connect power, download the app, select “Set Up New Hub”, connect to WiFi, sign into your account, add devices, and create activities.
Is the Harmony Hub compatible with smart home devices?
- Yes, the Harmony Hub is compatible with certain smart home devices such as smart thermostats, smart window shades, and smart lights.
Does the Harmony Hub work with devices connected to other smart hubs?
- Yes, the Harmony Hub can control devices connected to other smart hubs.
How do I know if my devices are compatible with the Harmony Hub?
- You can use the device compatibility search tool to verify if your devices can be controlled by the hub.
Can I use a remote control with the Harmony Hub?
- Yes, you can use a Harmony remote control with the hub.
Can I control the Harmony Hub with a tablet or just a smartphone?
- You can control the Harmony Hub with both a tablet and smartphone.
To Sum Up
The Harmony Hub is an exceptional product for home entertainment systems and home theaters. With its simple setup process and ability to integrate with many different devices, it makes controlling your entertainment system effortless. If you are interested in learning more about the Harmony Hub.


1 Comment