Home theaters have a lot of magic that often goes unseen. High-end systems may look impressive, but for the average person’s budget, projectors offer the biggest bang for your buck. They may seem intimidating, but mid-range projectors can deliver a giant screen with a wow factor. And now, with the growth in projector use, setting them up is easier. How to adjust the projector image?
Don’t worry if you’re unsure how to adjust the image on a projector. We’ve got you covered. In this article, we’ll go over the basics of setting up your projector correctly. We’ll cover adjusting the angle, fitting the image to your screen, and straightening. With these tips, you’ll be able to enjoy a great home theater experience.
Correctly adjusting the image on a projector is simple with these steps:
- Turn on the projector to display an image.
- Use the feet or lens shift to adjust the angle.
- Use keystone correction to adjust the shape of the image.
- Zoom in or out to fit the screen.
- Repeat the above steps as necessary.
Some people may be intimidated by these steps, but they’re easy to handle. In the following sections, we’ll explain each step in detail to help you get the best image from your projector.
Table of Contents
Adjust the Angle of a Projector
Angle adjustment is one of the key aspects of setting up a projector. The chances of the projector lining up with the screen perfectly are low, so you may need to make some adjustments. The goal is to get the rectangle of light coming from the projector’s lens to be “square” with the wall.
There are digital tools to help with angle adjustment, but first, try to physically align the hardware as much as possible. This will make it easier to get the image square with the wall and produce the best image quality.
Using the Projector’s Feet
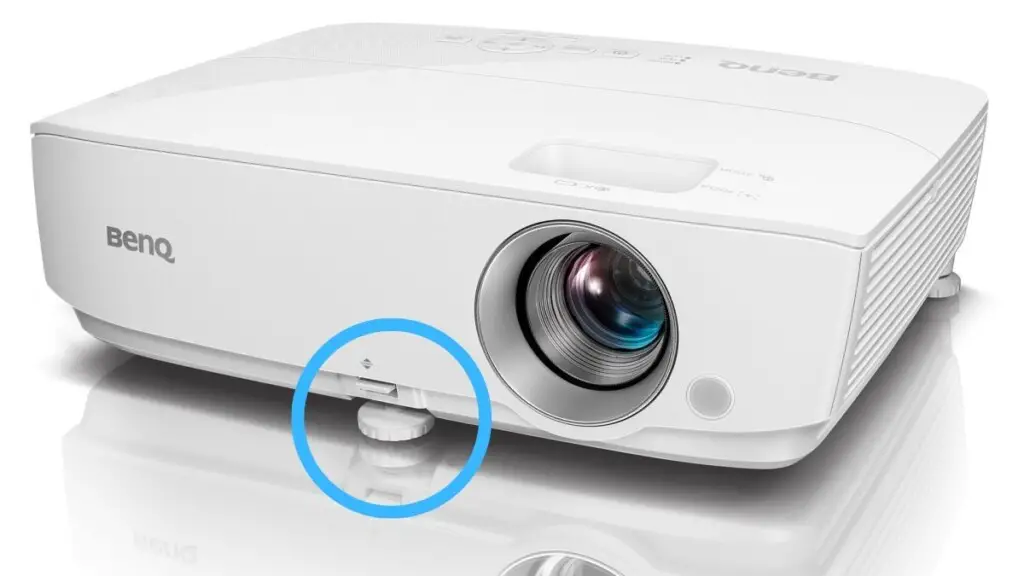
Most consumer-grade projectors have feet on the bottom to level the machine. If your projector is not mounted from the ceiling, the feet will be your first stop for angle adjustment. Turn on the projector, point it at the screen, and use the feet to adjust the image.
The goal is to make the top two corners of the image line up horizontally. If your screen is level, you can use a level to adjust the feet. But, even with a level, the image may not line up perfectly with the screen. In that case, it’s best to watch the image and make the necessary adjustments.
It’s important to note that at this stage, the image may overlap with the screen. It may be too wide or too narrow, but don’t worry about that now. Focus on leveling the top two corners with the screen and making the necessary adjustments. Once that’s done, you can move on to the next step.
On a Ceiling Mounted Projector
If you have a ceiling-mounted projector, don’t worry. Most ceiling mounts have articulation or adjustment available at the joint that holds the projector. Check your mount to see if there’s any way to adjust the angle. If not, there are other options available, so keep reading for more information.
Using the Lens-Shift Controls
Want to make sure your projector is properly aligned? Check if it has lens-shift controls. These controls let you adjust the lens, not the whole projector, by modifying the length of the feet or the joint holding the ceiling-mounted projector.
Keep in mind, this feature is not as common in budget models. To see if your projector has it, consult the manual for instructions on lens-shift. If your projector does have lens-shift, you may be able to change the lens position and get the top corners level.
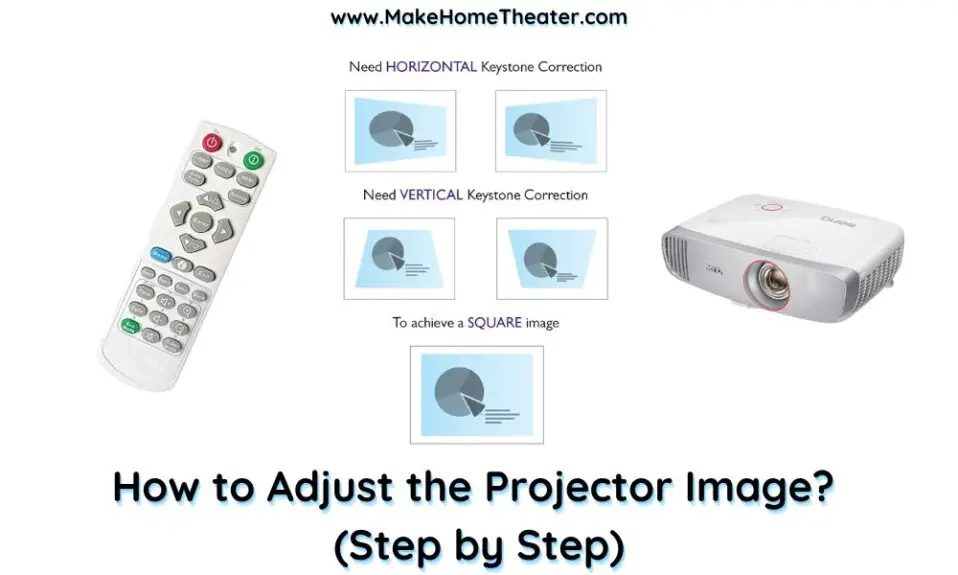
Align the Projector for Screen Compatibility – Keystone Adjustments and Zoom In/Out
Have you noticed that the bottom corners of your projected image don’t line up? This can cause the image to appear tapered, wide at the top and narrowing towards the bottom, or vice versa. Although not ideal, this is a common issue that indicates the projector is not placed directly in the center of the screen.
Projectors are typically placed on a table, in an alcove below the screen, or mounted above the screen. When light hits the screen at an angle, it can cause the trapezoidal shape.
But don’t worry! Keystone correction is a standard tool in the projector industry that corrects this issue. It’s named after the keystone block in masonry, which holds an arch in place and has a similar trapezoidal shape.

Keystone correction is a digital tool that helps you fix the angle issue by adjusting the way the projector displays the image. You can access the keystone correction through physical buttons or digital controls, as described in your projector’s manual.
Use the keystone correction to straighten the image. Simply adjust it up or down until the top corners align with the bottom corners in a straight line. Keep using the correction until the image appears rectangular. For reference, take a look at the pictures provided.
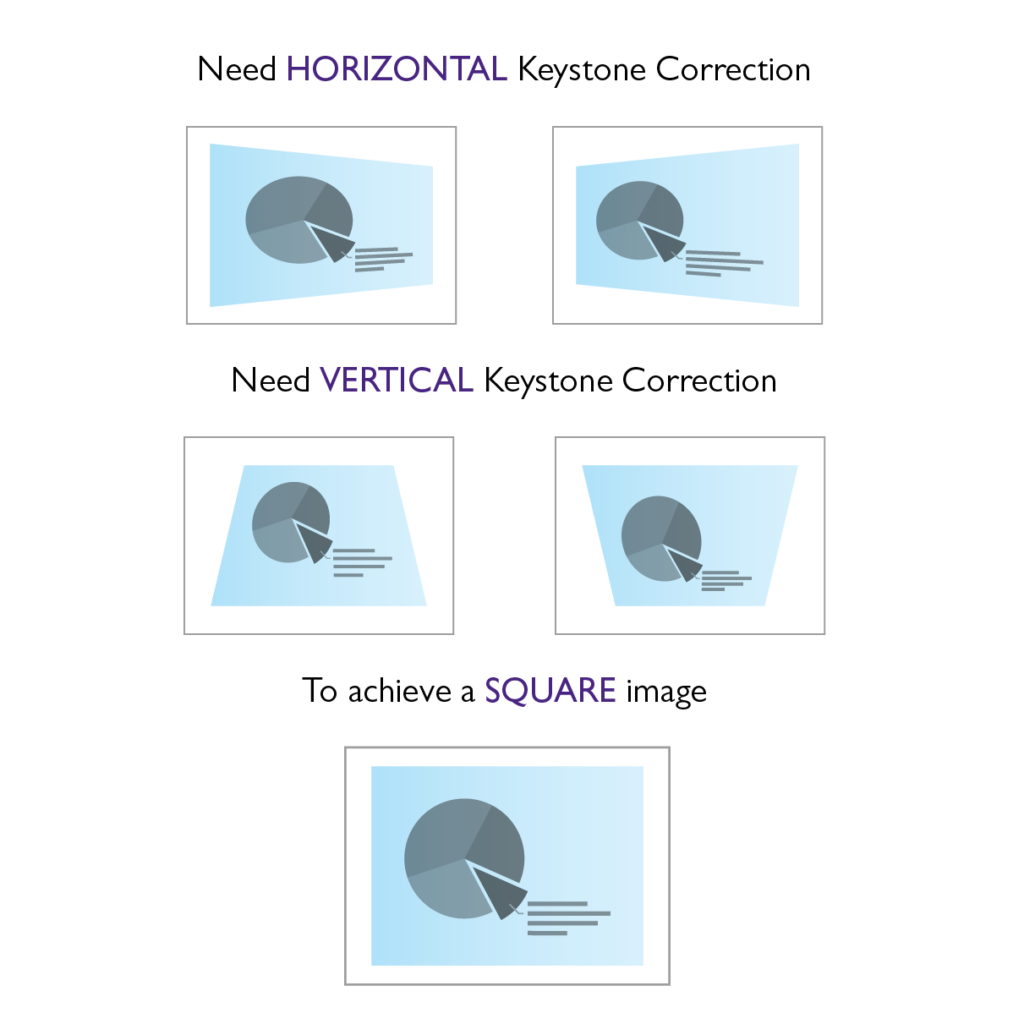
It’s important to note that the discussion so far has focused on vertical keystone correction. Horizontal keystone correction is also possible, but it is less standard. Some projectors offer both vertical and horizontal keystone correction, but if your projector does not, you will need to manually adjust the projector’s position to align with the centerline of the screen.
Experiment with both the vertical and horizontal keystone correction (if available) until the projected image becomes a clear rectangle. Then, you can move on to the next step of fitting the image to your screen.
Projector Zoom Adjustments
After adjusting the angle and correcting the keystone, you may still find that the rectangular image overlaps the edges of the screen or doesn’t fill it enough. To solve this, locate the zoom function on your projector and adjust it until the image fits the screen horizontally.
Although it may still appear too high or too low, don’t worry, the next section will provide the final step to get a perfect fit.
Read Also: The Best Projector Mounts on the Market
Instructions for Correcting Projector Image Distortion: Iteration
To make sure your projector fits the screen perfectly, you have to make small adjustments. After setting the angle and correcting the keystone, you discovered that the zoom feature wasn’t enough to fit the image on the screen.
In this case, you have to go back to the angle adjustment step. Make small adjustments until you get a rectangle that sits straight on the screen. Then, adjust the keystone correction again to fine-tune the image. Repeat this process until you get a perfect fit.
It may seem like a lot of work, but with patience and attention to detail, you’ll achieve a perfectly fitted image. And once you get it right, you’ll enjoy a beautiful and clear projection for all your presentations and entertainment needs.
Additionally, don’t forget to check the aspect ratio of your projector and make sure it matches the aspect ratio of your screen. The aspect ratio is the proportion of the width of the image to the height of the image. If the aspect ratio of the projector is different from the screen, the image will appear stretched or compressed, so it’s important to have them match.
Also, take note of the screen size and the resolution of your projector. If you have a large screen but a low-resolution projector, the image may appear pixelated. Make sure to choose a projector with a resolution that can adequately display the size of your screen.
In conclusion, fitting a projector to a screen takes patience, but with these steps and a little bit of trial and error, you can achieve a great result. Good luck!
Related Q&A
- Q: What should I do to adjust the image size on my projector? A: Use the zoom and focus adjustments on the lens or remote control.
- Q: How can I fix a blurry image on my projector? A: Use the focus adjustment on the lens or remote control until the image is clear.
- Q: What if my projector image is too small? A: Increase the image size by moving the projector closer or using the zoom adjustment.
- Q: What if my projector image is too large? A: Decrease the image size by moving the projector further away or using the zoom adjustment.
- Q: How can I center my projector image on the screen? A: Adjust the keystone correction or use physical adjustments on the projector to center the image.
- Q: What should I do if my projector image is crooked? A: Use the keystone correction or physical adjustments to straighten the image.
- Q: How can I change the aspect ratio on my projector? A: Use the aspect ratio adjustment in the projector menu or on the remote control.
- Q: What if my projector image is too dark? A: Increase the brightness in the projector menu or on the remote control.
- Q: What if my projector image is too bright? A: Decrease the brightness in the projector menu or on the remote control.
- Q: How can I adjust the color balance on my projector? A: Use the color balance adjustment in the projector menu or on the remote control.