

When setting up a projector, it’s common to encounter obstacles like ceiling fans, lighting fixtures, or other ceiling features that prevent you from placing your projector on the centerline of the screen. But, don’t worry this doesn’t mean you can’t use a projector at an angle.
Can You Use A Projector At An Angle?
Yes, you can use a projector at an angle. However, if you angle the projector towards the screen, instead of being centered in front of it, the images will appear distorted. But, don’t worry, you can use the built-in keystone correction feature to adjust the angle of the image.
Using a projector at an angle can be tricky, but with a little effort, you can make it work for you. The built-in keystone correction feature is easy to play around with and helps to correct the image angle. So, even if you have obstacles that prevent you from placing your projector in the center of the screen, you can still enjoy a clear and bright image.
Table of Contents
Use a Projector at an Angle – Probable Issues
This is where the built-in keystone correction feature comes in handy. It allows you to adjust the angle of the image, so even if the projector is not perfectly centered, the image will still appear clear and bright.
However, it’s important to note that using a projector at an angle can lead to distorted images. This is because when the projector is angled, the light beams are no longer projected directly onto the screen. But with keystone correction, you can correct the image angle and ensure a clear and accurate image.
Keep in mind that using a projector at an angle may require more adjustments and fine-tuning. But with a little effort, you can make it work for you. So, even if you are not able to place your projector perfectly centered, you can still enjoy a great viewing experience.
If you have to set a projector up this way, some of the problems you may encounter include:
The keystone effect
The keystone correction feature helps to fix this distortion by adjusting the angle of the image. It can be done either manually, through the projector’s settings, or automatically, using sensors built into the projector.
Manual keystone correction allows you to adjust the image angle by using the projector’s remote control or buttons. This method can be a bit more time-consuming, but it’s still a reliable way to correct the keystone effect.
On the other hand, automatic keystone correction uses sensors built into the projector to detect the angle of the image and make adjustments accordingly. This method is faster and more convenient, but it may not be as accurate as manual correction.
In any case, keystone correction is an essential feature that helps to ensure a clear and accurate image, even when the projector is not perfectly centered. It’s an easy way to fix the distortion caused by the keystone effect, and enjoy a great viewing experience.
Glare or hot-spotting
Choosing the right screen surface is important when setting up a projector to ensure a clear and bright image. The surface of the screen affects how light is reflected and can cause glare or bright spots that make it difficult to see the image.
When using a projector at an angle, it’s even more crucial to choose the right screen surface. Tilt the projector can cause the light beams to hit the screen at a different angle, leading to more glare or hot spots on the screen.
For example, if your projector is a short-throw projector, it’s better to use a screen with a matte surface that will help to reduce glare and hot spots. On the other hand, if your projector is a long-throw projector, it’s better to use a screen with a glossy surface that will help to enhance the color and contrast of the image.
Off-axis light loss
The reason for this is that when the projector is tilted, the light beams are bouncing off the screen’s surface at an angle, rather than being directed straight to the viewer. This results in less light reaching the viewer’s eyes and making the image appear darker.
This problem can be exacerbated when using a screen surface made from reflective materials such as gloss or glass. These surfaces reflect more light, but when the projector is tilted, the light gets reflected at an angle, and it doesn’t reach the viewer’s eyes.
To fix this problem, it’s essential to choose a screen surface that is not highly reflective, like a matte finish. This type of surface will help to reduce the amount of light that bounces off the screen and into the viewer’s eyes, providing a brighter image.
Another solution would be to use a projector with a high lumen output, this will allow for more light to reach the screen and make the images appear brighter even when the projector is tilted.
When using a projector at an angle, the main issue is often lighting and image distortion. These problems occur because the light beams are no longer projected directly onto the centerline of the screen.
How to Use a Projector at an Angle?

Before setting up your projector and screen, check that they are compatible. It’s important to know that not all screens work well with all projectors. For example, if you have a short-throw projector, you might experience hot spots and glare on your screen even if it’s centered.
If your projector and screen are compatible but the images still aren’t clear, don’t worry. Here are a few tips to help you correct the problem.
Keystone Correction
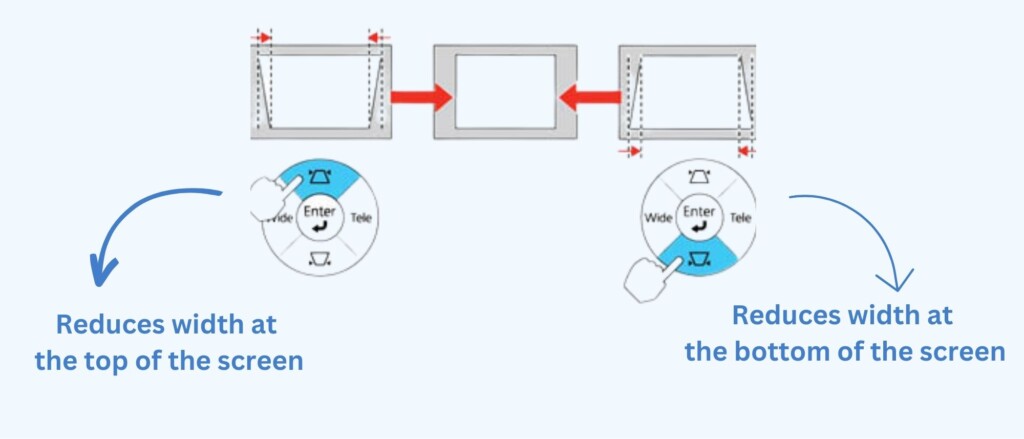
When you have the projector set up at an angle the top and bottom of the image will often appear distorted. Most models come with a convenient feature referred to as “keystone correction”. There are two types of keystone correction, manual and automatic. The one on your projector will depend on the make and model.
Manual keystone correction
Manual keystone correction is a feature that allows you to adjust the alignment of the projected image. It is typically used to correct the distortion that occurs when the projector is not placed at the exact center of the screen.
The keystone correction is typically controlled by a dial located on the internal lens of the projector. To use it, you can raise or lower the angled projector until the image is in focus. If the projector has vertical axis adjustment, you can move the control dial left to right until the image is centered.
Automatic or digital keystone correction
Automatic or digital keystone correction is a feature that is typically found on high-end projectors. This feature allows the projector to automatically adjust the image alignment, even if the projector is not placed at the exact center of the screen. This can be very useful if you are using the projector in a space where it is difficult to position it at the exact center of the screen.
The advantage of automatic keystone correction is that it makes it easier to bring images into focus when the projector is angled. It can adjust both the horizontal and vertical axis, which makes it more versatile than manual keystone correction.
Some projectors, like the YABER Y30 Native 1080P Projector (on Amazon) list their Keystone correction capabilities in the product title, making it easy to see if the projector has a large correction range. In the case of this Yaber model, it lists +/- 50 degrees of the Keystone correction range, which is a relatively large range.
However, not all projectors list their Keystone correction capabilities in the title, and you may need to check the product descriptions to see if the projector has a large correction range.
Lens Shift
The lens shift feature is similar to keystone correction in that it allows you to adjust the location and shape of the image without moving the projector. Most projectors come with this feature, with the exception of extremely low-priced models.
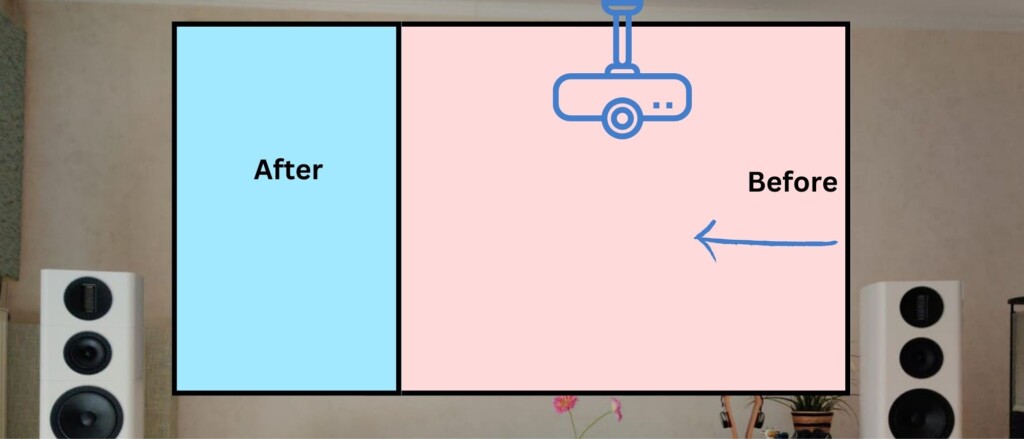
With the lens shift, you can manually adjust the lens assembly side-to-side, up and down, or even diagonally without adjusting the projector’s angle. This feature works best when you are adjusting off-center or uneven images. It allows you to easily make minor adjustments at a time. Sometimes, this is all you need to center the image.
The lens shift on most projectors is a small dial that can be found on the projector’s body. Some higher-priced models are motorized and come with a remote control that allows you to adjust the lens shift remotely.
Disadvantages of Lens Shift and Keystone Correction
Both lens shift and keystone correction allow for either horizontal or vertical adjustments. However, keystone correction typically allows for horizontal adjustments, while lens shift is more commonly used for vertical adjustments. Horizontal lens shift is usually found on higher-priced projectors.
Another issue with using the lens shift feature is the range it measures, which is typically only 5 – 50 percent of the image width. This can limit the amount of room you have to play with the image, making it more difficult to center. There are also disadvantages associated with keystone correction, such as a decrease in resolution and the possibility of images appearing distorted even after the corrections are made.
Keep in mind that adjusting the shape and location of an image through lens shift and keystone correction is never as effective as moving the projector or the lens. Adjusting the image at its source is almost always the best option.
In addition, you should be prepared to use all these tools interchangeably, making small changes to the keystone, then lens shift, then the keystone again as you dial in a clean image. This way you can achieve the best results.
Conclusion
When using your projector at an angle, it’s important to be prepared to make adjustments to the image. The image may appear off-center or distorted at first, but this doesn’t necessarily mean that you need to move the projector. Keystone correction and lens shift are both capable of centering and clearing up distorted images without changing the projector’s angle.
Keystone correction allows you to adjust the image horizontally and can be done manually or digitally. Lens shift allows you to adjust the image vertically and is done manually. Both tools can be used interchangeably to make small adjustments until the image is in focus.
It’s important to note that while these tools can help bring the image into focus, adjusting the image at its source, by moving the projector or lens, is still the most effective method. However, if you are unable to move the projector, using keystone correction or lens shift can still help you achieve a clear, centered image.
Related Q&A
How do I fix the keystone effect on a projector?
- Use the built-in keystone correction feature, which allows you to adjust the angle of the projector to center the image on the screen.
Can I use any type of screen with a projector?
- No, not all screens are compatible with all projectors. Make sure to choose a screen that is compatible with your projector to avoid glare and hot-spotting.
What causes off-axis light loss when using a projector?
- Off-axis light loss occurs when the projector is at an angle and the projected light bounces off to the side instead of directly to the center of the screen.
Can I use a short-throw projector with an ambient light rejecting screen?
- No, using a short-throw projector with an ambient light rejecting screen will likely result in hot-spots and glare.
How do I adjust the image on a projector?
- Use the remote control to access the settings menu and adjust the image manually or use the built-in keystone correction feature.
How do I fix the hot-spotting issue on my projector?
- Make sure the projector and screen are compatible. If the problem persists, try adjusting the angle of the projector or the screen surface.
Can I use a projector at an angle without distorting the image?
- The image may be distorted if the projector is angled towards the screen. However, you can use the built-in keystone correction feature to correct the angle.
What is the keystone correction feature on a projector?
- Keystone correction is a feature that allows you to adjust the angle of the projector to center the image on the screen.
How do I use the manual keystone correction feature on my projector?
- Use the control dial located on the internal lens to raise or lower the projector until the image is in focus.
Is it possible to use a reflective screen with a tilted projector?
- No, using a reflective screen with a tilted projector will likely result in off-axis light loss, making the images appear dark.
Can I use a projector at an angle without issues?
- There may be issues such as distortion, hot-spotting, and off-axis light loss when using a projector at an angle.
How do I fix the glare issue on my projector?
- Make sure the projector and screen are compatible. If the problem persists, try adjusting the angle of the projector or the screen surface.
Can I use an ambient light-rejecting screen with a long-throw projector?
- Yes, using an ambient light-rejecting screen with a long-throw projector is likely to work well, as long as the screen is compatible with the projector.
How do I fix the distortion issue on my projector?
- Use the built-in keystone correction feature to adjust the angle of the projector until the image is in focus.
How do I use the automatic keystone correction feature on my projector?
- Check the projector’s settings menu and select the automatic keystone correction option, the projector will adjust itself to center the image on the screen.


1 Comment